In this post, detailed instructions will be presented concerning how to launch RMCProfile program on all platforms. Going through procedures covered in this post should guarantee a smooth start of RMCProfile program to enable the running of both the main
rmcprofileprogram and those plotting routines.
To enable the plot functionality, we need
Xmingserver installed and running on Windows. The installer forXmingcan be downloaded here.
1. Xming server should be launched before the main RMCProfile program. So, before moving on, we should check whether Xming is running. To launch it, search for Xming in windows start menu and click on it. Clicking on the little triangle in Windows taskbar, if we can see Xming icon as shown below, we should be fine to move on.
2. Unzip the downloaded .zip package to obtain the folder with the name of RMCProfile_package.
3. Grab the RMCProfile_package folder and put it somewhere in our system.
The RMCProfile main folder can be renamed to whatever sensible, i.e., it does not have to stay with the name of
RMCProfile_package. In current instruction, we will stay with its original name.
Sometimes, if the RMCProfile main folder is put too deep (i.e. the full path to the folder is too long), Windows may fail to interpret necessary paths, which will cause failure when running RMCProfile. Therefore, it isstrongly recommendedthat the RMCProfile main folder is put somewhere shallow.Nowadays, many cloud drive services are able to back up some common folders (e.g., 'Desktop'), in which case the actual path to those backed up folders may not be as shallow as they appear.
4. Go into the RMCProfile_package folder and double click on the RMCProfile_setup.bat file to launch the main RMCProfile window.
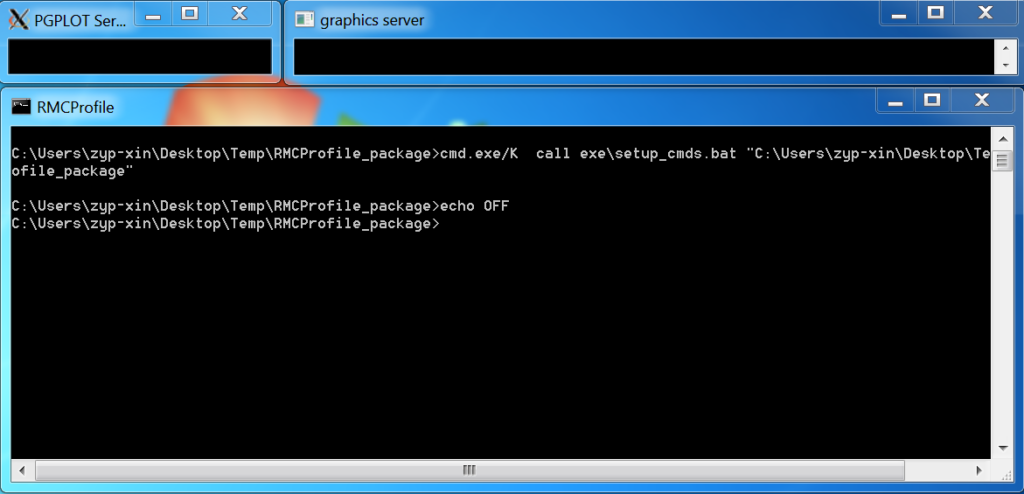
5. If all steps are executed successfully, we are supposed to see three windows as shown below. Seeing those three windows (also, you are expected to have the title of the terminal window exactly RMCProfile) indicates you have RMCProfile launched successfully. If any of those three windows is missing, you may need to go back to steps 1-4 above.
6. Now, you should be done with the setup of the program, which means you can then execute RMCProfile commands within the RMCProfile terminal (the one titled RMCProfile). To move on, one could refer to several quick tutorials covered in this link, https://rmcprofile.ornl.gov/tutorials.
The latest RMCProfile package on MacOS is released as a
dmgfile, which allows us to install the program in a convenient single shot. Instructions provided here willONLYtake care of thedmgpackage butNOTthe oldzippackage.
To enable the plot functionality, we needXQuartzserver installed and running on MacOS. Installer forXQuartzcan be found here.
1. XQuartz needs to be launched independently from the main RMCProfile program. Not like on Windows, the XQuartz can be launched either before or after the main RMCProfile program. As long as you see the XQuartz icon in your docker (as presented below), you should be fine.
2. Open the downloaded dmg file will bring up a finder window showing how to install RMCProfile – simply just drag and drop.
3. To launch RMCProfile, simply press command + space key combo to bring up the spotlight search box and type in rmcprofile. Then look for the rmcprofile application to launch it.
4. Now, you should be done with the setup of the program, which means you can then execute RMCProfile commands within the RMCProfile terminal (the one titled RMCProfile). To move on, one could refer to several quick tutorials covered in this link, https://rmcprofile.ornl.gov/tutorials.
Not like either Windows or MacOS, X graphics server should be already built in the operating system on most Linux distros so you may not need to worry about it at all. If that is not the case on your particular Linux distro, please let us know by leaving comments below.
1. Download the tar file and unpackage it to obtain the RMCProfile_package folder.
2. Put the RMCProfile_package folder anywhere in your area and change directory to it on terminal.
3. Execute either RMCProfile_setup_no_term (to stay in the same terminal) or RMCProfile_setup (to open up a new terminal window).
4. Now, you should be done with the setup of the program, which means you can then execute RMCProfile commands within the RMCProfile terminal (the one titled RMCProfile). To move on, one could refer to several quick tutorials covered in this link, https://rmcprofile.ornl.gov/tutorials.
For those who are interested in running RMCProfile fitting on cluster server (e.g., through job submission), you may want to refer to another post here.
Comments
14 responses to “How to launch RMCProfile program”
furosemide for dogs 20mg
furosemide for dogs 20mg
lasix generic medication
lasix generic medication
zydena
zydena
online pharmacy cialis
online pharmacy cialis
cialis insurance coverage
cialis insurance coverage
vidalista 80mg price
vidalista 80mg price
stendra 200 mg
stendra 200 mg
topiramate dosage for weight loss
topiramate dosage for weight loss
propecia results
propecia results
rogaine walmart brand
rogaine walmart brand
acyclovir cream side effects
acyclovir cream side effects
minoxidil men’s study summary
minoxidil men’s study summary
avanafil mechanism clinical notes
avanafil mechanism clinical notes
vardenafil side effect notes for patients
vardenafil side effect notes for patients